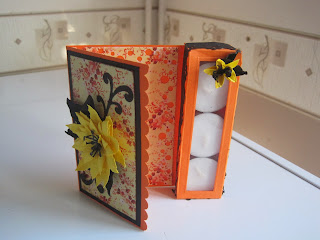
Size
6″ x 12″ Card Stock (Base Scored according to Diagram)
4-3/8 x 3-3/8 Card Stock in a contrasting colour
4-1/4″ x 3-1/4” Patterned Paper
1-1/4″ x 4-1/2″ Acetate
Materials Used
12 x 12" Solid Premium Cardstock Colossal (75pcs) - Capsule
Docrafts Papermania Capsule Collection - Sunshine A4 Paper pack
Crafters Companion Extra Strong Permanent Glue Tape Pen
3 mm Ultra Clear Tape
Glue dots
Tools Used
Bigshot Die Cutting Machine
Stampin Up Simply Scored Score Board
Stampin Up Scallop Edge Border Punch
Stampin Up Bone Folder
Lea'bilities Poinsettia Die
Starburst Paper Punch
Directions
- Using your Simply Scored board butt the 6" side of the cardstock against the side of the board and score at 1/2", 1- 1/4", 2- 3/4", 3-1/2" and 8-1/2 .
- Using your Simply Scored board again butt the 12"side up against the board and score both sides at 3/4" .
- Burnish all the score lines with your bone folder
- Cut out the notches (black areas on the Diagram)and draw the rectangular apeture, leaving about 1/4" border, then cut this out with a craft knifeand steel edge ruler.
- Add Acetate to the rectangle apeture you just created using ultra clear tape along the 1/4" border you left. You can also emboss the acetate for a special effect.
- Apply Crafter's Companion Extra strong tape pen to the area marked in red on the diagram to glue the box together.
- Punch the border of the other short edge and your card is ready to decorate.
- If you wanted to add more tea candles or a chocolate; all you have to do put them together the way they will lay in the box and measure then add 1-1/2" to this measurement and cut your card using this measurement (x) x 12" e.g 8"x12".
Diagram

Flowers
For the big flower topper on the main card:
- Die cut 2 of each size of the flower, 5 big leaves and one of each flourish.
- Punch one starburst for the stamen of the big flower.
- Place all flowers on the molding pad (thick craft foam will also work) to shape and press down in the center to cup the flower slightly.
- Glue and stack the petals: 2 large, 2 medium and 2 small - offsetting each layer.
- Place in the staburst in the center of the flower and glue in place.
- Fold each leave in half and make small concertina folds from the bottom of the leave to the top at a slight angle.
- Open up the leaves and glue 2 on the one side of the flower and 3 together on the other.
- Arrange and glue on top of the flourishes and add to the main card.
For the small flower on the side of the box:
- Die cut 2 small flowers and 2 small leave.
- Punch one starburst for the stamen
- Place both flowers and the starburst on the molding pad (thick craft foam will also work) to shape and press down hard in the center to cup the flower and use your fingers to cup it around the stylus.
- Glue and stack the petals and starburst again offsetting each layer.
- Fold each leave in half and make small concertina folds from the bottom of the leave to the top at a slight angle.
- Unfold the leaves and glue then onto the side of the small flower before adhering the arrangement to the side of the box with a glue dot.


