Thursday, 30 January 2014

My Memories Site Wide Sale and more Freebies

https://www.mymemories.com/
Add caption


Use the DISCOUNT CODE :

STMMMS12755

 during your checkout and receive:
$10 off the software purchase and a $10 gift certificate to the online store


Tuesday, 28 January 2014

Card-Making-Magic is my favourite resource site

I have been a keen follower of this site since I started cardmaking and has learned so much from her.  Christina Griffiths is another really inpirational lady, not every one likes her cards but I love them and thinks her tutorials and videos are simply the best.  If you are new to cardmaking then Card-Making-Magic is designed especially for you.  The website is easy to follow. All the catagories are are on your left and you can even get a FREE copy of "Card Making Sketches".  This booklet explains how to use sketches and show you a few variations on the same sketch.

She has two websites Card Making Magic as well as Flowers Ribbons and Pearls that is her blog and her own Youtube Channel and Facebook page.  As I was about to post this I also foud out that she is now on Twitter, wow what a busy lady.

A great place to start would be with Card-making-equipment you may need or Basic Tools that explains the basics you will need in detail and follow on with links to all the other fun stuff cardmakers come to believe they can not live without. 

Other useful links can be found on the Card-Making-Techniques, Card Making Tutorials, Video Tutorials, and useful resources. Actually just pop over to her websites and click on any of her links as they are all brilliant. 

Just a quick word to say thank you to Griff, her hubby and  her camera man, you make a great team and we love watching all the videos.

Christina please keep on sharing, no matter what other may say I love your work and share this as a very special thank you for all I have learned from you.

One of the most Inspirational site I have found

Hi today I want to share this site with you as I find it very inspirational and am sure you will too.  Not only is it full of tips, tutorials and videos but it is all being done for a super good course. 

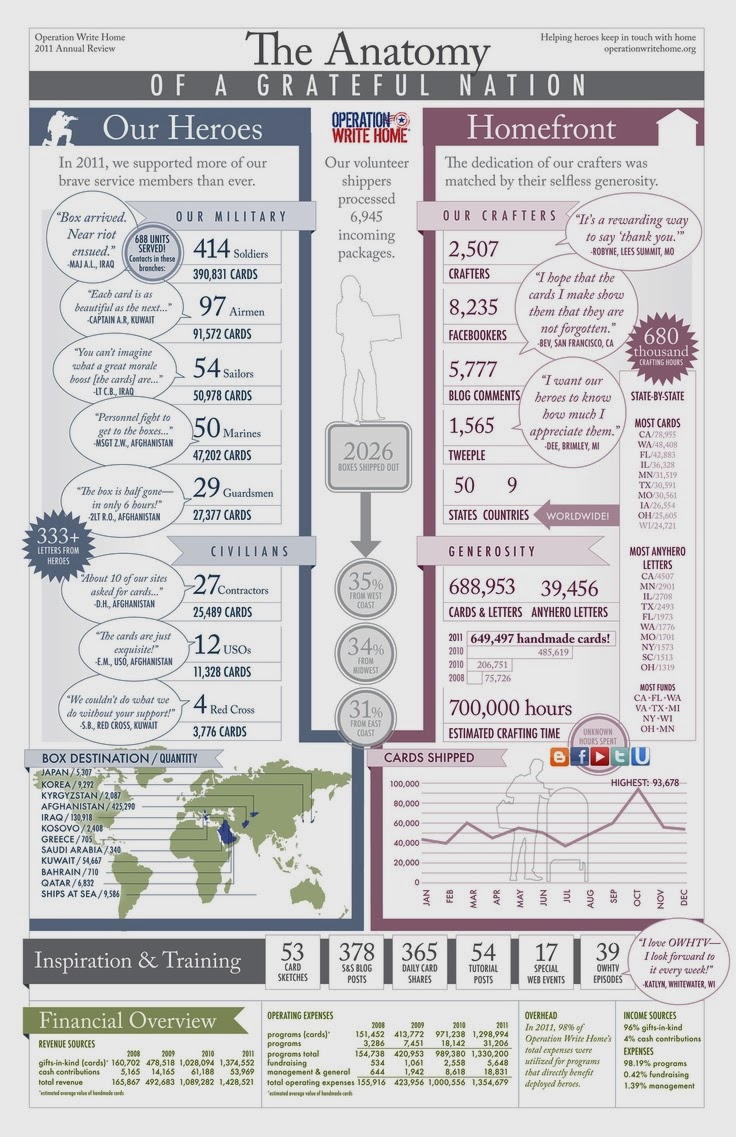
It was started by Sandy Allnock and as you can see on the Chart below, that I stole from their Pinterest page you can see just how many tutorials, sketches and videos you can find there.  Sorry I could not think of a better way to tell you just how much is on offer on this site without this image I am sure they will forgive me this naughty but it begs to be shared.


Here is just a few links you must have a look at if you suffer from crafters block:

Interactive Cardmaking Project The perfect place to start if you are new at cardmaking

Cardmaking Glossary This Glossary contains definitions of terms used in crafting, and answers to questions new comer might.

Tutorials  These tutorials are divided into “101″ level for newer crafters; “201″ for those ready to try something a little more advanced; and “301″ for those who aren’t faint at heart!

Sketches  and how to use and adapt these sketches to suit your needs.  Most of their sketches comes with measurements for all layers making them super fast and easy to use.  Please note that thse are for the American A2 Size.  Here is a post and video to explain the difference between USA and a UK card sizes just in case you are not sure.

Sandy's Personal Blog,  Youtube Channel and her Before and After page 

Making Card Kits for group crafting fun.

Stamp Surgery how to make the most of your clear stamps by changing them a little

And of course you just have to subscribe to their youtube channel as well:  Operation Write Home

Ok I am stopping now as these should keep you busy for tonight.


MyMemories Suite 5 with discount code


Use the DISCOUNT CODE :

STMMMS12755

 during your checkout and receive:
$10 off the software purchase and a $10 gift certificate to the online store

This award winning software will help you create beautiful albums, projects, and custom gifts in a matter of minutes.


What's New in MyMemories Suite?


Completely Redesigned Interface.


New Content for Version 5:
     12 Designer Templates including 241 Backgrounds
     952 Embellishments and 540 Monograms!
Quickly move objects up and down using Layers Palette
Double Page Spread or single page view options for your workspace
Pull on page Guides from ruler
Transparent Background option for PNG Export
Recolor Embellishments and Backgrounds All New Color Palette. Featuring Color Combos!
Browse into iPhoto with Gallery
Browse All Subcategories at the same time or select subfolders to see smaller groups
Project List will display the name of all files used to create your project
Create your own Custom Background Categories and stay organized


 MyMemories Suite 5 Feature List

MyMemories Suite 5 scrapbooking software provides the design tools that will help you to build entire albums effortlessly using the many installed templates, or starting your own pages from scratch. This user-friendly software is great for beginners and design pros alike.

Creating your project
Use one of the large selection of designer templates to jump start your project or start from scratch to make your exactly the way you want it.
Gallery
Drag and drop photos and embellishments easily using the gallery.
Project Sizes
Custom Canvas Sizes to fit your project needs.
Search
Use the Global search to quickly find embellishments, backgrounds, shapes and imprints installed in the software.
Backgrounds
Use papers installed in the software or browse for other content on your computer. With the “Apply to All” feature the software will automatically add the same background paper or color to all of your pages.
Embellishments
Use elements installed in the software or browse for other content on your computer. Add a drop shadow or change the color of your page elements. You can also resize, mirror, flip and rotate them individually or as a group.
Photos
Edit your photos with Crop, Flip, Mirror, Color, Matte, Drop Shadow, Red Eye, Rip, Tile and Shape. Add a filter like Fish Eye, Black and White, Sepia, Darken, Brighten, Blur, Sharpen, Negative, Emboss, Sketch and more.
Text
Choose font, size, bold, italic, alignment and color. Use Word Art Designer to create custom Headlines with bevel, emboss, gradients, color, outline, drop shadows, warp or shape, or paste images into text.
Shapes
Fill shapes with papers, images, color or text. Also add a matte and drop shadow. Export shapes as SVG files for your electronic die cutter.
Imprints
Imprints act much like a stamp. Change color or size and add drop shadows.
Calendars
Our interactive calendar feature will let you easily change from one year to the next. Customize the font, color, size, numbers, borders, month and year.
Paint
Create your own paint layer on your page. Change the color and size.
Album
Check or change album properties, interactive preview, Spell check, Error check and select the Project Supply List to see a list of all the items used in creating your pages.
Share
Export your project directly to professional printing services for your photobooks or calendars or print at home. Export your project as a png, jpg or svg file formats.


Installation 

Computer System Requirements
Prior to installing MyMemories Suite 5, ensure that your computer meets the following technical specifications:

Windows:
� Windows� XP, Windows Vista�, Windows� 7, Windows� 8
� Pentium� IV 2 GHz or better or comparable AMD processor
� 2 GB RAM
� 64 MB Video RAM
� DVD-ROM drive
� Available Hard Disk Space: 10 GB

Macintosh:
� OS X 10.6.8 or later (with the latest JavaTM updates)
� Intel� Core� 2 Duo 2 GHz or better processor
� 2 GB RAM
� 64 MB Video RAM
� DVD-ROM drive
� Available Hard Disk Space: 10 GB

System Settings
� Monitor Resolution: 1152 x 864 or higher

Other Recommendations
� Broadband Internet
� Digital Camera
� Printer
� Scanner

MyMemories Suite Weekly Freebie


Check out these great freebies!
Available free until February 9th.
 
1 Quick Page


5 Digital Papers and 10 Page Elements


10 Digital Papers, 23 Page Elements and 82 Monograms


Additional Information about using and downloading these kits

Image Quality
High-resolution (print quality) JPG and PNG files (with transparency).

Download Options
Easy install directly into MyMemories Suite Scrapbooking software. Purchase My Memories Suite scrapbooking software Here or General use installer for other software applications (i.e., Adobe Photoshop & Photoshop Elements, Paint Shop Pro, etc.). Please Note:  Album and Photobook templates are intended for installation in the MyMemories Suite software only.  The General download will still contain all of the digital paper and page element files and template pages in a flat jpeg format so that you can recreate the template. The layered pre-built pages are not available in the general download.

Download Access
You do need to create an account on this website as all download options are available after checkout by clicking the “Access Your Downloads” provided on the order confirmation page. You may also access your downloads after logging into the My Account section located at the top right of the website.


Thursday, 23 January 2014

Trick for shading when colouring

I was browsing some blogs and found a  really good idea for working out where shading should be on your image when colouring.  It's super easy and all you need is some acetate and a permanent marker with your stamped image.  I even made one for my 10 year old that loves drawing and colouring and it has improved his work as well.

It was written by Anice from Funkyhand and posted on the Get funky and craft blog.  I hope that It will help you as much as it has help me.  Have fun Colouring and thank you to Anice for sharing her great tip.

You can find the tutorial here. 


Saturday, 11 January 2014

Dimension Stamps Project Club - December 2013

The December Club Set was the first valentine's set for them since the start of the stamp club some time ago but was well worth waiting for.

I love the set and think that it is very versaitle.  I made quite a few cards from this set mostly feauring the rosebud as you can see in the photo's below.  Hope you enjoy looking at them as much as I enjoyed making them.

 Love is.....


Card Front
Card Inset

Challenge:
I made this card for The Outlaws Challenge group last week, I was ment to enter it in to the following sections:  Tuesdays Colours, Wednesday Sketch and Thursday's Twist before the PC decided to stop working, so I never posted in the challenges but thought I will still share it here with my readers.

Inks:
Background:
Versamark
Tim Holtz Distress inks in Fired Brick, Broken China
Memento inks in Rosebud and Lady bug
Topper:
Ranger Archival  in Jet Black
Tim Holtz Distress inks in: Spiced melon
Memento inks in:  Canteloupe

Markers:
Promakers in Fresh Meadow, Tropical Orchid  and Pink Lobster

Tools:
Anti Static Bag
Ribbon Slot Punch (unknow brand)
Martha Stewart Crafts - Embroidered Floral Corner Punch Around the Page
Spellbinders - Classic Hearts
Bigshot and Magnetic Platform
Non - Stick Heat Resistant Crafting Sheet

Embellishments:
Turquoise ribbon from my stash

Techniques:
Stamping
Masking
Heat Embossing
Resist Sponging
Matting and Layering
Punching
Die Cutting
Colouring

Just for you.....


Inks:
Ranger Archival  in Jet Black

Markers:
Distressed markers in Peeled Paint, Fired Brick, Victorian Velvet and Wild Honey

Paper:

Damask Rose by Jennifer Ellory (free gift Exclusive to Cardmaking and Papercraft)


Card:
Centura Pearl in Lavender
Black for matting from stash

Tools:
Sizzix Tim Holtz Valentine Background and Borders Set Embossing Folders
Corner Cromper

Embellishments:
Unknown die cuts a friend shared with me

Techniques:
Stamping
EmbossingColouring
Matting and Layering

Happy Valentines Day:


Card Front
Card Insert

Inks:


Colouring:


Tools:

Embellishments:


Techniques:
Stamping
Masking
Embossing
Colouring
Matting and Layering

Die Cutting

The Rose:

Card Front
Card Insert
This card was inspired by a song by Bette Midler called The Rose, an old favourite of mine.

Inks:
Ranger Archival  in Jet Black

Markers:
Spectum Noir Alcohol Markers

Card:
Centura Pearl in Yellow
Red Card for insert

Tools:
Martha Stewart Punch DOILY LACE TRIM Deep Edge Edger

Techniques:
Stamping
Colouring
Matting and Layering
Punching

  Hope you enjoyed looking at my samples for this club set, but it is now time to start plaaying with the January stamp sets.


    Friday, 20 December 2013

    3D Cardstock Star embelishment for cards in 3 easy steps

    1. Start with a punched or die-cut star and use a bone folder and moulding mat to score lines from each tip of the star to the center of the star.
    2. Now turn the star over and gently pinch along each score line to create definition.
    3. You can make the create the illusion of more depth by using a sponge dauber a emphasise the edges of the star and darken the score lines slightly.
    4. You can also add gems or pearls in the center of the star like I did in the card shown here.
    Hope you enjoy trying this, if you use bigger stars you can even create your own decor elements.

    Thursday, 12 December 2013

    SPECIAL REQUEST

    Here is a photo of my serious ill mother,please pray for her and if you can
    please send her a card to let her know that there are still people that care.
    Her Address:
    Mrs M Kotze
    P O Box 480
    Pyramid
    0120
    South Africa

    Please share on your pages to encourage others to pray for her and lets
    see how many cards she can get for Christmas to let her know she is thought of
    and remembered and will always be....
    It will really be appreciated

     
    Thank you for reading this post and your prayers


    Wednesday, 4 December 2013

    Tuesday, 3 December 2013

    My Christmas Cards are all made - Hoorray

    This year I actually managed to hand make all my Christmas Cards in less then two weeks. It is the first time since I started making cards 10 years ago that I will not be buying a single Christmas Card. This covers all the cards for my son's 30 Class mates, husbands collueges and family local and abroad, super wow and super affordable too. 
     This best about it all is that I managed to make it all with freebies (papers, stamps and Chipboard goodies) from various magazines, some Stephanie Barnard Framelit Flip-Its, a few Dimension Stamps stamp sets and card stock I already had, so super kind on my crafting budget as well. 
    Papercraft Inspirations Magazine love this reader challenge entry and and it is going to feature it in their February issue

    The 3D stars on this card can be created by die cutting or punching a few star shapes.  Score and fold a line from each point down to the centre point of each star.  Gently pinch each star along the score lines to create a 3d effect so they stand out.  Aply with glue dots or dimensional foam pads.

    I will be posting more photo's later, hope you like them all.